The Old-School Gardener’s Guide to Growing Massive, Rot-Free Onions
Growing your own onions is one of the most rewarding experiences for any home gardener. However, it can be incredibly frustrating to spend months tending to your garden beds only to pull up small, underwhelming bulbs, or worse, discover that your sets have rotted beneath the soil.
If you want to drastically increase your harvest size, eliminate weeds without harsh chemicals, and protect your crop from rot, the secret lies in an old-school planting method. By using two common household items and adjusting exactly how you place the bulbs in the dirt, you can force your plants to grow massive, healthy roots that yield gigantic onions.
Here is the complete, step-by-step guide to this traditional growing method.
The Two “Secret” Ingredients
Before you head out to the garden, you will need to gather two simple, natural amendments. You likely already have them on hand:
- Bicarbonate of Soda (Baking Soda): This common kitchen staple acts as a gentle, natural fungicide. When used as a pre-plant treatment, it significantly reduces the possibility of your onion sets rotting in the damp spring soil while simultaneously “waking up” the dormant bulbs so they start growing immediately.
- Hardwood Ash: Clean wood ash from a fireplace or fire pit is a gardener’s best friend. It is incredibly rich in potassium and essential minerals, which onions need to develop large, firm bulbs. It also acts as a natural deterrent for pests and helps suppress weeds.
Phase 1: The Wake-Up Soak
Do not plant your onion sets straight out of the bag. Preparing them with a specialized soak gives them a powerful head start.
- Inspect and Sort: Go through your onion sets and discard any bulbs that are squishy, moldy, or visibly unhealthy. You only want to plant the strongest sets.
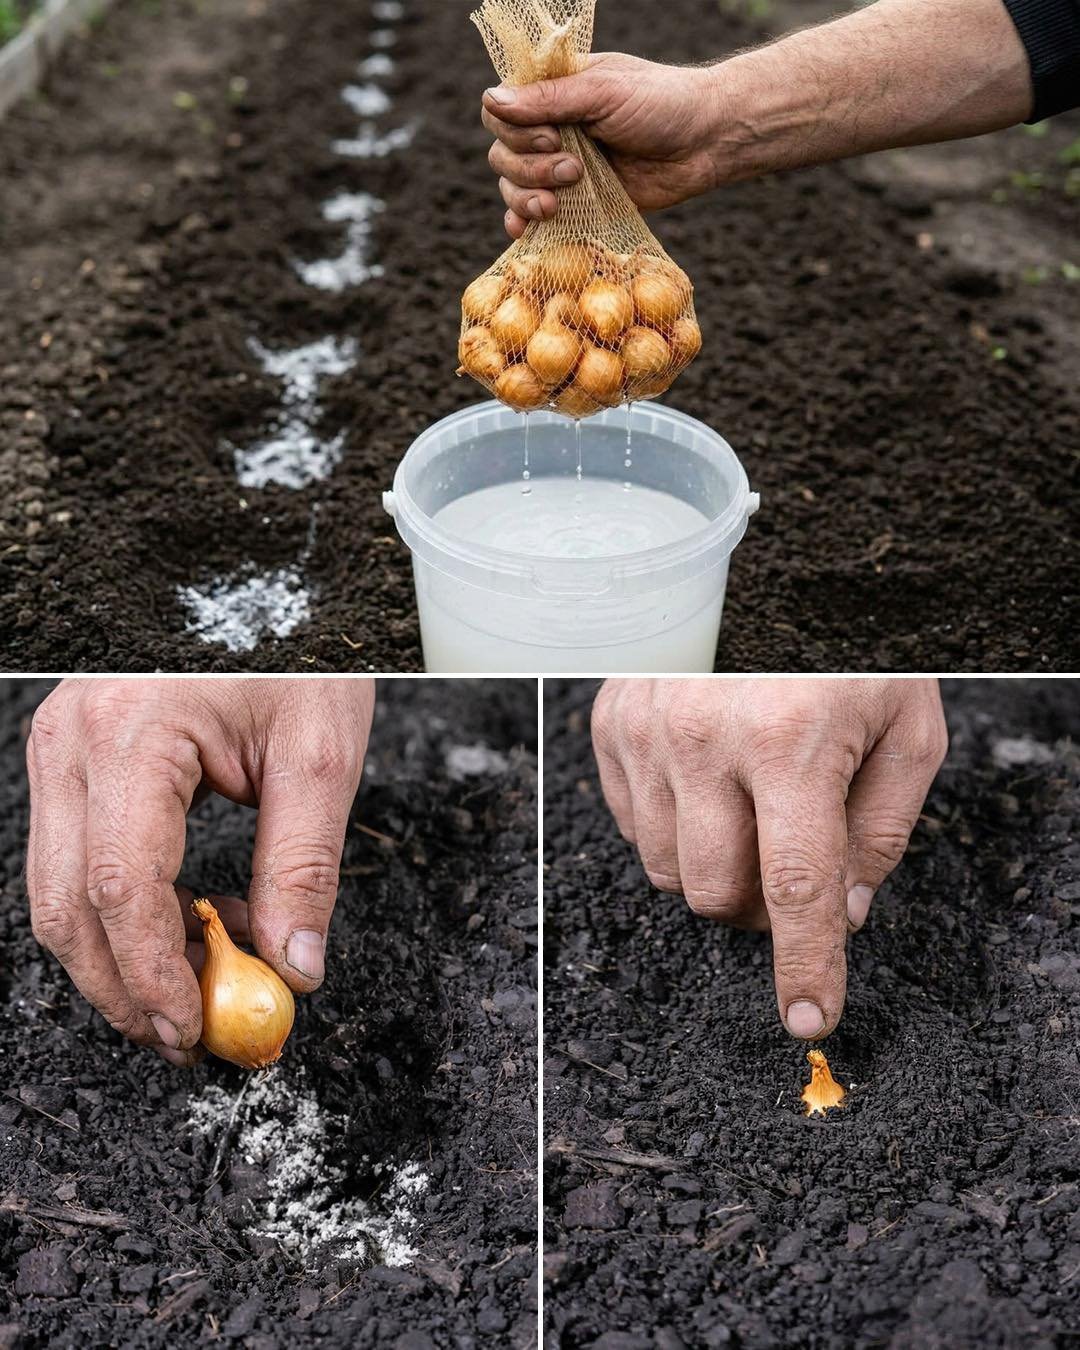
- Prepare the Bath: Fill a deep container or bucket with lukewarm water.
- Add the Baking Soda: Stir in exactly one teaspoon of bicarbonate of soda until it is completely dissolved in the water.
- Soak the Sets: Submerge your healthy onion bulbs into the solution.
- Wait Six Hours: Let the bulbs sit in the bath for exactly six hours. This timeframe is the sweet spot for hydrating the outer layers, neutralizing potential rot-causing fungi, and breaking the plant’s dormancy.
Phase 2: Proper Garden Bed Preparation
Onions from small bulbs should be planted in early spring—typically March or April—as soon as your garden soil is workable. Once your six-hour soak is complete, take the bulbs straight to the garden.
- Trench Depth: Dig your planting trenches or individual holes to a depth of exactly 5 centimeters (about 2 inches).
- Bulb Spacing: Space each planting site 10 centimeters (about 4 inches) apart to give the bulbs plenty of room to expand.
- Row Spacing: Keep the distance between your rows at 20 centimeters (about 8 inches) to allow for adequate airflow and easy harvesting.
- The Potassium Boost: Before placing the onion in the ground, drop a small pinch of wood ash directly into the bottom of each 5 cm hole. This ensures the roots hit a pocket of minerals the moment they start reaching down.
Phase 3: The “Breathing” Technique
This is the most critical step of the entire process, and it is where many well-meaning gardeners make a fatal mistake.
- Place the Bulb: Set the onion bulb into the hole directly on top of the wood ash, root end down.
- Do Not Bury Completely: When you push the soil back into the hole, do not bury the bulb entirely. The very top tip of the onion set must stick out a little bit above the soil line.
- Let It Breathe: The top of the onion needs to be exposed to the air to “breathe.” When the top is exposed to the elements, it naturally encourages the bottom of the plant to push its roots downward at a much faster rate to anchor itself.
Phase 4: The 3-Day Watering Rule
How you water your newly planted crop will determine the strength of its root system.
- Water Abundantly: Immediately after planting, give the entire onion bed a very deep, thorough watering.
- The 3-Day Drought: After that initial soaking, do not water the bed for three full days. By holding back water, you force the new roots to aggressively seek out moisture deeper in the soil. Deeper roots equal a stronger plant and a larger bulb.
- The Final Top Dress: Once the initial watering has soaked in, sprinkle a light layer of wood ash across the surface of the soil. This final protective barrier will naturally prevent weeds from taking hold and keep soil-dwelling pests away from your growing crop.
By following this precise, chemical-free method, your onions will establish faster, root deeper, and yield a remarkably rich, oversized harvest by the end of the season.